
Restaurant Social Media Agency Workflow: Producing Food Content for Multiple Clients
RestoPhoto Team · November 16, 2026 · 6 min read
The short answer: run every restaurant client through the same five steps each month: collect raw phone photos from the kitchen, lock one visual style per venue, produce the set, get approval from the client on their phone, and send a monthly report that shows what was made and approved. Keep each venue's photos, logo and usage separate. Most agency time goes to chasing photos and approvals, so fixing those two steps saves the most hours.
This guide lays out that workflow in detail, with the templates and habits that make it repeatable across five, ten or thirty restaurants.
Where agency time actually goes
If you manage social media for restaurants, content itself is rarely the bottleneck. The bottlenecks are:
- Getting usable photos. Kitchens are busy, owners forget, and photos arrive dark, blurry or mid-service.
- Keeping each client's look consistent when you're producing for many at once.
- Approvals. Owners approve by text at midnight, or not at all, and posts slip.
- Proving value. At renewal time, the client asks what they got for the money.
- Keeping clients separate. One wrong logo on the wrong restaurant's post is a bad day.
The workflow below is built around those five problems.
Step 1: Intake, getting raw photos from the kitchen
You don't need the kitchen to produce good photos. You need it to produce usable ones. Send every client a one-page photo brief:
- Whole dish in the frame, one dish per photo.
- Flash off, near a window if possible.
- Tap the dish to focus and hold still. Blurry photos can't be fixed.
- Real portions, rim wiped.
- Kitchen light, a regular table and a slight color cast are fine.
Then make it easy to send: a shared folder per venue, or a fixed day each week when the chef photographs new or seasonal dishes. When a client adds a new menu, ask for the whole menu at once rather than a few dishes a week. Batching saves both sides time.
Step 2: One style per venue, agreed up front
The fastest way to lose a client's trust is inconsistency: a moody dark photo on Monday, a bright marble one on Thursday. Agree on a style per venue before you produce anything:
- Surface and backdrop: dark wood, light stone, colored paper, the restaurant's own tables.
- Light: bright and airy or darker and more dramatic.
- Main angles: which dishes get overhead, 45 degrees or hero shots.
- Logo: whether it appears on photos, where and how visible.
- Formats: feed (4:5 or 1:1), stories (9:16), delivery apps.
Write it down as a short style card per client. It's the document a new team member reads before touching that account.
Step 3: Production in batches
Work per venue, not per task. Open one client, produce the whole month for them, close it, move on. Mixing clients in one session is how the wrong logo ends up on the wrong post.
A typical monthly set per restaurant might include:
- Photos of new and seasonal dishes for the feed and delivery apps.
- Templated posts: "New on the menu," specials, event posters.
- Captions for each post.
Step 4: Client approval, without the back and forth
Approval is where most schedules slip. Rules that help:
- One link, one decision per item. The client should approve or reject each photo and caption individually, not reply "looks good" to a folder.
- Mobile first. Owners approve from their phone between services. If it needs a laptop and a login, it waits a week.
- Approve the style before the set. Get the first image approved before producing the other twenty. If the look is wrong, you've lost one image, not a day.
- A default deadline. "Anything not reviewed by Thursday goes out as scheduled" only works if the client agreed to it in the contract. If not, ask.
Step 5: The monthly report
A report is not busywork. It's your renewal argument. For each venue, include:
- What was made: photos, videos, posts.
- What the client approved, and what is still waiting on them.
- A gallery of the month's work.
Keep it short, visual and easy to forward, because the person you send it to is often not the person who signs the check.
How RestoPhoto fits this workflow
RestoPhoto has an agency setup built around these steps. Here is what it does, in the order of the workflow above:
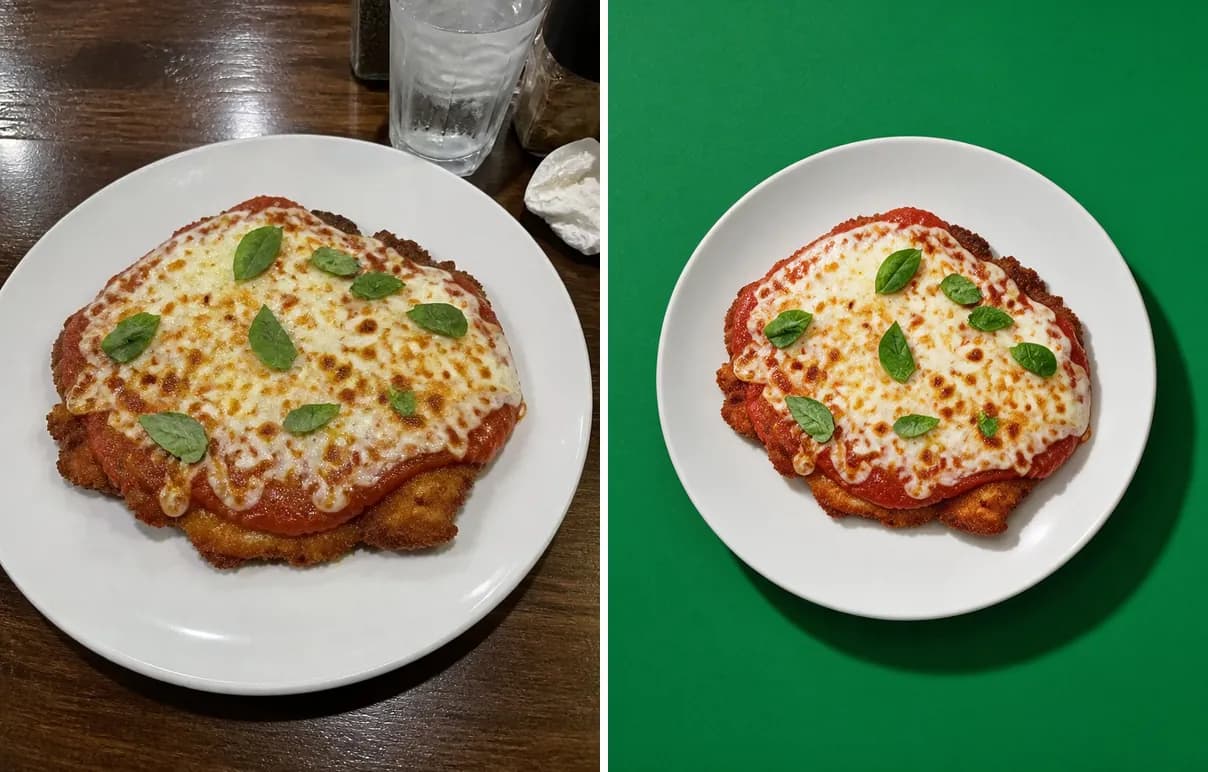
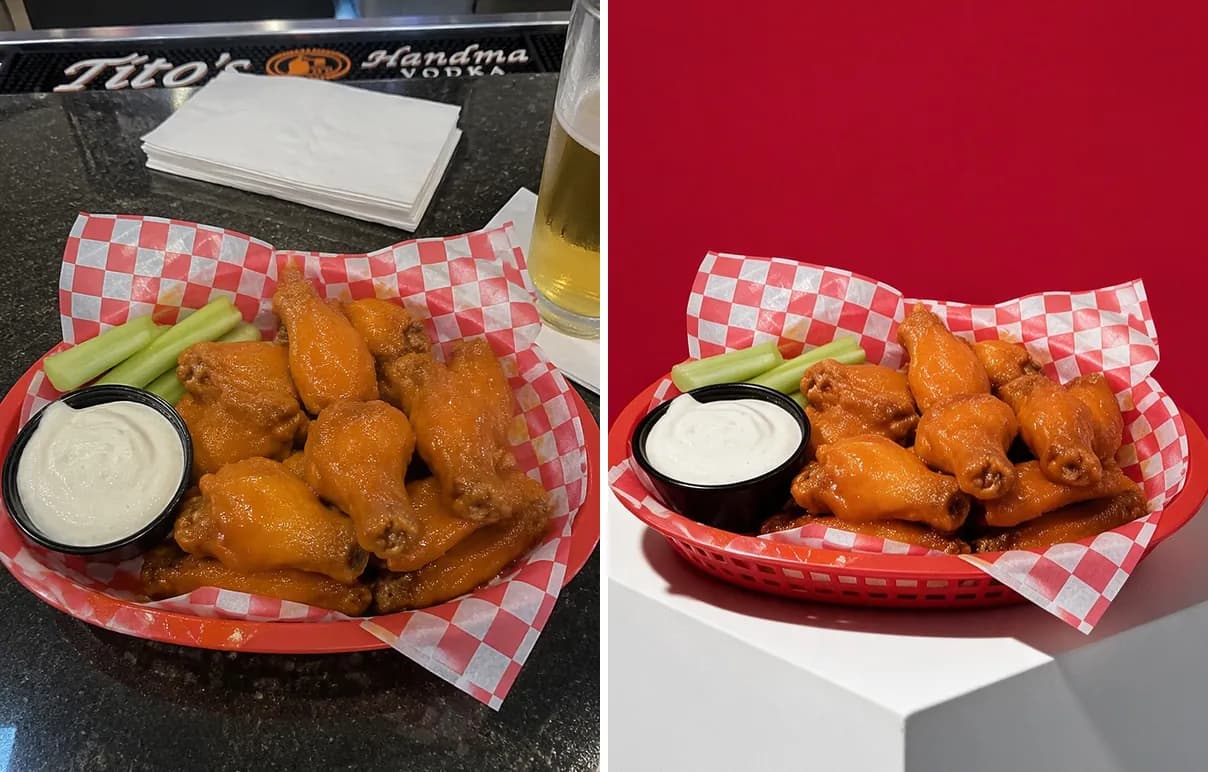
- Intake: the kitchen's phone photo is the input. The AI sets the light, the background and the framing, and each photo is made from the client's own photo of the dish. You can do the whole menu at once.
- Style: choose one style for the whole set. The client approves the first photo before the others are generated. There are over a hundred ready styles, with selections by cuisine, or you can set your own in Custom settings.
- Separation: every venue sits on one account and you switch between them in one click. Each venue keeps its own history, logo and usage counter. The logo is set once in the brand profile, with 9 positions and adjustable transparency.
- Approval: an approval link lets the client approve or reject each photo and caption on their phone, with no account needed.
- Reporting: a monthly report per venue shows photos made, what the client approved, what's waiting, and a gallery of the month. You save it as a PDF or a PNG card and send it on.
- Billing: one plan with one shared monthly quota that grows with every venue you pay for. You pay per venue, get one consolidated invoice and are billed monthly. A single venue can use at most three venues' worth of allowance, which covers the month a client launches a new menu. Volume discounts are available for more venues.
Templates (posters, posts, flyers) cover the rest of a typical monthly set.
The same caution applies to every client: AI can change small details of a dish, and some styles add props around the plate. Compare each result with the original before it goes to the client, so the chef never sees a garnish they don't serve.
The photos can be used anywhere, including menus, flyers, websites, delivery apps, Meta and Google ads and billboards, with no licensing fees and no watermarks, which matters when you're producing on a client's behalf.
A monthly calendar for one restaurant client
| Week | Task |
|---|---|
| 1 | Collect new dish photos from the kitchen. Confirm specials and events for the month. |
| 1 | Produce the first photo in the agreed style. Send for approval. |
| 2 | Produce the full set of photos, videos and templated posts. Write captions. |
| 2 | Send the set for approval item by item. |
| 3 | Schedule approved posts. Update delivery app photos if the menu changed. |
| 4 | Send the monthly report. Flag what's still waiting on the client. |
Run the same calendar for every client, staggered by a few days, and the workload stays level instead of piling up at month end.
Test it on one client first
Before changing your process for every account, run one restaurant through it for a month. Try it on one of your own dishes. Your first photo is free, no card.
Try RestoPhoto on one of your own dishes
FAQ
How do agencies keep content consistent across many restaurant clients?
With a written style card per venue and by producing one venue at a time. Locking the style with a first approved image before producing the rest avoids redoing whole sets.
How should restaurant clients approve social media content?
Item by item, on their phone, from a single link. Asking for a decision on each photo and caption is faster and clearer than a general "looks good."
What should a monthly report for a restaurant client include?
What was made, what the client approved, what's still waiting, and a gallery of the month's work. Keep it short enough to forward.
How do I get better photos from restaurant kitchens?
Send a one-page photo brief (whole dish, flash off, in focus, one dish at a time) and set a regular day for photos. Usable phone photos are enough to start from.
How does RestoPhoto price for agencies?
You pay per venue, with one shared monthly quota that grows with each venue, one consolidated invoice and monthly billing. Volume discounts are available for more venues.
Try RestoPhoto with your own photo
Upload a dish photo and choose a style. Compare the result with the original before publishing.
Try RestoPhoto